Hey there, tech enthusiasts! In today’s digital world, being able to access your devices remotely—like your trusty Raspberry Pi—is practically a superpower. Whether you're managing a home server, running IoT projects, or just grabbing files from afar, knowing how to set up remote access for Raspberry Pi behind a router on Windows 10 can save you time, money, and headaches. This guide is your step-by-step companion to making it happen without breaking the bank.
Listen up, because remote access isn’t just a cool tech perk—it’s a necessity. It gives you the power to interact with your devices no matter where you are, as long as you’ve got an internet connection. For Raspberry Pi users, this means endless possibilities for automation, monitoring, and project management. But let’s be real—figuring out network settings and keeping things secure can feel like solving a Rubik’s Cube for beginners. Don’t worry, though; we’ve got your back.
This article is here to make things crystal clear. We’ll walk you through every step, give you practical tips, and share expert insights to help you set up remote access for your Raspberry Pi behind a router on Windows 10—all for free. By the time you finish reading, you’ll have everything you need to take control of your Pi from anywhere in the world. Let’s get started!
Read also:Unpacking The Diva Flawless Controversy A Closer Look
Table of Contents
- Introduction to Remote Access for Raspberry Pi
- Why Remote Access Is Important
- Understanding Network Basics
- Tools You Need
- Setting Up Raspberry Pi
- Configuring Your Router
- Understanding Port Forwarding
- Dynamic DNS Setup
- Connecting from Windows 10
- Security Best Practices
- Troubleshooting Tips
- Conclusion
Introduction to Remote Access for Raspberry Pi
Alright, let’s dive right in. Remote access for your Raspberry Pi lets you take control of and interact with your device from anywhere in the world. This feature is a game-changer for managing servers, automating home systems, or even keeping tabs on IoT devices. But here’s the thing: if your Raspberry Pi is sitting behind a router, you’ll need to get familiar with a few networking concepts to make it work.
One of the biggest hurdles is figuring out how to access your Raspberry Pi from the outside world while keeping it secure. That’s where this section comes in. We’re going to break down the basics of remote access and explain why it’s so important for Raspberry Pi users. By the end of this part, you’ll have a solid foundation to build on as we move into more advanced topics.
Why Remote Access Is Important
So, why should you care about remote access? Well, it comes with a ton of benefits, especially for Raspberry Pi users. With remote access, you can:
- Manage and monitor your projects from anywhere in the world—whether you're at home, at work, or on vacation.
- Access all the files and data stored on your Raspberry Pi without needing to be physically present.
- Troubleshoot issues and update your Pi remotely, saving you time and effort.
- Integrate your Raspberry Pi into larger systems for smoother automation and control.
For both professionals and hobbyists, remote access transforms the way you interact with your tech. It gives you flexibility and convenience, allowing you to unlock the full potential of your Raspberry Pi. It’s not just a nice-to-have—it’s a need-to-have.
Understanding Network Basics
What Is a Router?
Think of a router as the traffic cop for your home network. It connects your local devices to the internet and manages the flow of data between them and the outside world. When you’re setting up remote access for your Raspberry Pi, understanding how your router works is key.
Routers use something called IP addresses to identify devices on your network. Every device, including your Raspberry Pi, has a unique local IP address. But here’s the catch: if you want to access your Pi from outside your network, you’ll need to tell your router to forward incoming requests to the right device. Without that, your router won’t know what to do with the traffic.
Read also:Unlocking The Power Of Video Content Why Its So Sexy And How To Master It
What Is an IP Address?
An IP address is like a digital address for your devices. There are two types you should know about:
- Local IP Address: This is used within your home network to identify devices locally.
- Public IP Address: This is how your network is identified on the internet.
When you’re setting up remote access, you’ll need to use your public IP address to connect to your network. From there, you’ll route the connection to your Raspberry Pi. Makes sense, right?
Tools You Need
Before we jump into the setup process, let’s make sure you’ve got everything you need. Here’s a quick checklist:
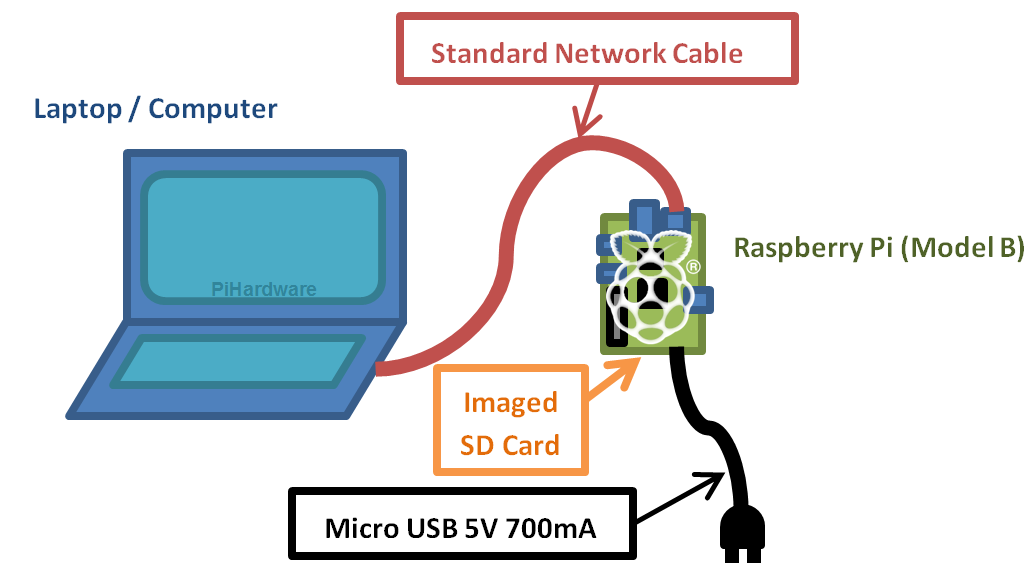
- Raspberry Pi: Make sure your Raspberry Pi is up and running with the latest version of Raspberry Pi OS. Outdated software can cause headaches down the line.
- Router: You’ll need access to your router’s admin panel to tweak the settings. Don’t worry—it’s easier than it sounds.
- Windows 10 PC: A computer running Windows 10 will be your gateway to connecting to your Raspberry Pi remotely.
- SSH Client: Software like PuTTY or Windows Terminal is essential for creating secure connections to your Pi.
- Dynamic DNS Service: A free service like No-IP or DuckDNS will help you manage your public IP address, even if it changes.
Having these tools ready will make the setup process smoother and increase your chances of success. Trust me, preparation is key!
Setting Up Raspberry Pi
Alright, let’s prep your Raspberry Pi for remote access. Follow these steps carefully:
Install Raspberry Pi OS: Double-check that your Raspberry Pi is running the latest version of Raspberry Pi OS. Updates often include important security patches and new features.
Enable SSH: SSH (Secure Shell) is what allows you to connect to your Raspberry Pi securely. To enable it, open the terminal on your Pi and type the following command:
sudo raspi-config
From there, navigate to "Interfacing Options" and turn on SSH. Easy peasy.
Find the Local IP Address: To figure out your Raspberry Pi’s local IP address, run this command in the terminal:
hostname -I
This will give you the IP address you’ll need later.
These steps will get your Raspberry Pi ready for remote access. Now let’s move on to the next part.
Configuring Your Router
Your router is the linchpin of your remote access setup. Here’s how to configure it:
Access Router Admin Panel: Open a web browser and enter your router’s IP address (usually 192.168.1.1 or 192.168.0.1). This will take you to the admin panel.
Login: Use your router’s credentials to log in. If you’ve forgotten them, check the manual or the label on the router itself.
Find Port Forwarding Settings: Look for the section in your router’s admin panel that deals with port forwarding. This is where the magic happens.
Getting your router set up correctly ensures that incoming connections are directed straight to your Raspberry Pi. It’s like giving your Pi its own front door.
Understanding Port Forwarding
What Is Port Forwarding?
Port forwarding is basically the process of directing internet traffic to a specific device on your local network. For example, if you want to access your Raspberry Pi via SSH, you’ll need to forward port 22 to its local IP address. Here’s how to do it:
- Select a Port: Pick a port number—commonly, port 22 is used for SSH.
- Enter Local IP Address: Input the Raspberry Pi’s local IP address so your router knows where to send the traffic.
- Save Settings: Save your changes and restart your router if necessary. Sometimes a fresh start is all it needs.
Port forwarding is crucial for making sure your Raspberry Pi can be accessed from outside your network. Without it, you’re basically stuck behind closed doors.
Security Considerations
While port forwarding is necessary, it does come with some security risks. That’s why it’s important to use strong passwords and consider extra security measures like firewalls or fail2ban. Security should always be top of mind when setting up remote access.
Dynamic DNS Setup
Your public IP address can change from time to time, which makes maintaining a stable remote connection tricky. That’s where Dynamic DNS (DDNS) comes in. DDNS services link a domain name to your public IP address, so even if your IP changes, you’ll still have a reliable way to connect.
Here’s how to set it up:
Sign Up for a DDNS Service: Use a free service like No-IP or DuckDNS to get started.
Install DDNS Client: Download and install the DDNS client on your Raspberry Pi. This will automatically update the domain name whenever your public IP changes.
Test the Setup: Verify that the domain name correctly points to your public IP address. A little testing goes a long way.
With DDNS in place, you’ll always have a dependable way to connect to your Raspberry Pi, no matter what your IP address is doing.
Connecting from Windows 10
Now that your Raspberry Pi is all set up, it’s time to connect from your Windows 10 PC. Here’s how:
Install an SSH Client: Use software like PuTTY or the built-in Windows Terminal to create the connection.
Enter the Hostname: Use the DDNS domain name or your public IP address as the hostname when setting up the connection.
Login with Credentials: Enter your Raspberry Pi’s username and password to log in. Once you’re in, you can interact with your Pi just like you would if you were sitting right in front of it.
Boom! You’re now connected to your Raspberry Pi remotely. How cool is that?
Security Best Practices
Security is non-negotiable when it comes to remote access. Here are some best practices to keep your setup safe:
- Use Strong Passwords: Weak passwords are like leaving your front door unlocked. Make sure your Raspberry Pi and router have strong, unique passwords.
- Enable Two-Factor Authentication: Add an extra layer of security by enabling 2FA wherever possible. It’s like having a second lock on your door.
- Limit Access: If you know which devices will be connecting, restrict access to those specific IP addresses. Less is more when it comes to security.
- Regularly Update Software: Keep your Raspberry Pi OS and router firmware up to date to protect against vulnerabilities. Updates often fix bugs and patch security holes.
By following these practices, you’ll minimize security risks and enjoy safe, reliable remote access to your Raspberry