Alright, let’s dive into the future of connectivity. In today’s hyper-connected world, managing IoT devices remotely isn’t just a luxury—it’s a necessity. Whether you’re tinkering with smart gadgets at home or overseeing industrial automation systems, being able to control and monitor devices from afar is crucial. One of the best ways to do this is by leveraging SSH (Secure Shell) on a trusty Raspberry Pi. In this guide, we’ll walk you through setting up a free, secure, and reliable IoT management system using these two powerful tools.
Now, before we get too far, let’s break it down. SSH is a protocol designed to keep your communications safe, even over sketchy networks. Think of it as a digital bodyguard for your data. And the Raspberry Pi? It’s like the Swiss Army knife of computers—small, affordable, and insanely versatile. Together, they’re a dream team for managing IoT devices remotely. No matter if you’re a hobbyist or a seasoned pro, this setup can save you time and money without sacrificing security.
This guide will take you step by step through configuring SSH on your Raspberry Pi, connecting to your IoT devices, and keeping everything locked down tight. By the time you’re done, you’ll have the skills to take control of your IoT projects like a pro. So, buckle up—it’s going to be a wild ride!
Read also:The Heart Of Brewing Exploring The World Of Brewers
Table of Contents
- What Is SSH, and Why Should You Care?
- Why the Raspberry Pi Is Your New Best Friend
- Setting Up SSH on Your Raspberry Pi
- Connecting to Remote IoT Devices
- Securing Your SSH Connection
- Troubleshooting Common Issues
- Best Practices for SSH Remote IoT Management
- The Benefits of Using SSH with Raspberry Pi
- Why This Solution Saves You Money
- Wrapping It All Up
What Is SSH, and Why Should You Care?
Let’s start with the basics. SSH, or Secure Shell, is a cryptographic network protocol that allows you to securely communicate between two devices, even when the network around you isn’t exactly secure. Think of it as a secret handshake for computers. It encrypts all the data moving between devices, ensuring that prying eyes can’t steal your sensitive information. This makes it perfect for managing IoT devices from afar.
So, what makes SSH so special?
- Encryption: Your data is scrambled during transmission, making it unreadable to anyone who intercepts it.
- Authentication: SSH verifies the identity of both devices, ensuring that you’re talking to the right machine and not some random hacker.
- Flexibility: You can use SSH for everything from running commands to transferring files, making it a versatile tool for IoT management.
For anyone dabbling in IoT, SSH is a game-changer. Whether you’re controlling a smart thermostat or monitoring sensors in a factory, SSH gives you the tools to do it safely and efficiently. It’s like having a personal assistant for your devices—but one that doesn’t take coffee breaks.
Why the Raspberry Pi Is Your New Best Friend
Okay, let’s talk about the star of the show: the Raspberry Pi. This tiny, affordable computer has become a favorite among hobbyists, educators, and professionals alike. Why? Because it’s basically a Swiss Army knife for tech enthusiasts. Running on a Linux-based operating system, the Pi comes equipped with a variety of GPIO (General Purpose Input/Output) pins, making it perfect for IoT projects.
Why Choose the Raspberry Pi?
There’s a reason the Raspberry Pi is so popular. Here’s why it’s a top pick for IoT enthusiasts:
- Cost-Effective: You don’t need a second mortgage to afford one. The Pi is cheap but packs a punch when it comes to performance.
- Energy-Efficient: It doesn’t guzzle power like a gas-guzzling truck. This makes it ideal for long-term projects.
- Customizable: You can tweak it to fit your exact needs, whether you’re building a smart home or a weather station.
- Compatible: The Pi works seamlessly with a wide range of sensors and devices, giving you endless possibilities for your projects.
And let’s not forget the community. The Raspberry Pi has a massive support network, with tons of tutorials, forums, and documentation to help you every step of the way. It’s like having a whole team of experts in your corner.
Read also:Bake Like A Pro Sallys Secrets To Perfect Blueberry Scones
Setting Up SSH on Your Raspberry Pi
Configuring SSH on your Raspberry Pi is simpler than you might think. Follow these steps, and you’ll be up and running in no time.
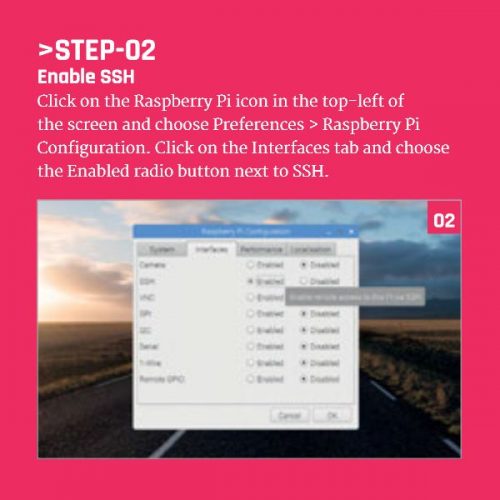
Step 1: Enable SSH
Enabling SSH on your Raspberry Pi is as easy as flipping a switch. Here’s how to do it:
- Open up your terminal and type
sudo raspi-config. - From the menu, navigate to “Interfacing Options” and select “SSH.”
- Choose “Yes” to enable SSH, then reboot your Pi to apply the changes.
Step 2: Find Your IP Address
Once SSH is enabled, you’ll need to know your Raspberry Pi’s IP address. This is like its digital address, and you’ll need it to connect remotely. To find it, type hostname -I in the terminal. Easy, right?
Connecting to Remote IoT Devices
With SSH up and running on your Raspberry Pi, it’s time to connect to those remote IoT devices. This part’s a breeze, especially if you’re using an SSH client like PuTTY (for Windows) or the built-in terminal on macOS and Linux.
Steps to Connect:
- Fire up your SSH client and enter your Raspberry Pi’s IP address.
- Log in using the default credentials (username: pi, password: raspberry). If you’ve changed them, use your updated info.
- Once you’re in, you can start running commands to interact with your IoT devices. For example, you can use Python scripts to pull data from sensors or control actuators remotely.
Think of it like a remote control for your entire IoT setup. With SSH, you’re in the driver’s seat.
Securing Your SSH Connection
Now, here’s the deal: security is non-negotiable when it comes to managing IoT devices. You don’t want some random hacker taking over your smart fridge or turning off your security cameras. Here are some tips to keep your SSH connection locked down tight.
Use Strong Passwords
First things first: create a strong, unique password for your Raspberry Pi. Avoid using the default credentials, as they’re the first thing a hacker will try.
Enable Key-Based Authentication
Key-based authentication is like a digital lock and key system. It’s way more secure than passwords alone. Here’s how to set it up:
- Generate an SSH key pair by typing
ssh-keygenin the terminal. - Copy your public key to your Raspberry Pi using
ssh-copy-id. - Disable password authentication in the SSH configuration file to add an extra layer of security.
Stay Updated
Finally, keep your Raspberry Pi’s operating system and software up to date. Updates often include security patches that protect against new threats. It’s like giving your system a regular checkup to make sure it’s in tip-top shape.
Troubleshooting Common Issues
Even with the best setup, things can go wrong. Here are some common problems and how to fix them.
Connection Issues
Can’t connect to your Raspberry Pi via SSH? Don’t panic. Try these troubleshooting steps:
- Double-check that SSH is enabled on your Raspberry Pi.
- Make sure you’ve got the right IP address and that your network connection is solid.
- Restart your Raspberry Pi and try connecting again.
Authentication Failures
Getting locked out? Authentication errors are usually caused by incorrect login details or misconfigured keys. Take a second look at your credentials and ensure that your key-based authentication is set up correctly.
Best Practices for SSH Remote IoT Management
To get the most out of your SSH remote IoT management system, follow these best practices:
Organize Your Devices
Label and categorize your IoT devices to keep things running smoothly. Think of it like organizing your tools in a toolbox—it makes everything easier to find and manage.
Monitor System Logs
Regularly check your system logs to spot potential issues before they become big problems. It’s like preventive maintenance for your IoT setup.
Automate Tasks
Use scripts and automation tools to handle repetitive tasks. This not only saves you time but also reduces the chances of human error. Automation is your secret weapon for efficiency.
The Benefits of Using SSH with Raspberry Pi
Using SSH with a Raspberry Pi for remote IoT device management offers a ton of advantages:
Cost-Effective
Raspberry Pi is a budget-friendly solution that doesn’t skimp on performance. It’s perfect for hobbyists, small businesses, and anyone looking to stretch their tech dollar.
Scalable
SSH allows you to manage multiple devices at once, making it ideal for projects of all sizes. Whether you’re controlling a handful of smart gadgets or an entire network of industrial sensors, SSH has you covered.
Secure
With its encryption and authentication features, SSH keeps your IoT devices safe from cyber threats. It’s like putting a steel door on your digital house.
Why This Solution Saves You Money
Compared to commercial IoT management platforms, using SSH with a Raspberry Pi is a wallet-friendly option. According to a study by the Linux Foundation, open-source technologies like Raspberry Pi can slash project costs by up to 50% while maintaining top-notch performance and reliability.
Plus, with all the free resources and community support out there, learning and implementing SSH-based solutions has never been easier. It’s like having a personal tutor who’s always ready to help.
Wrapping It All Up
There you have it. SSH remote IoT device management with Raspberry Pi is a secure, scalable, and cost-effective solution for managing smart devices. By following the steps in this guide, you’ve armed yourself with the knowledge to set up a system that meets your project needs and keeps your devices safe.
We’d love to hear about your experiences and insights in the comments below. And while you’re at it, check out our other articles for more tips and tutorials on IoT and Raspberry Pi projects. Stay connected, stay curious, and keep innovating. The future is yours to shape!